SaaS founders, digital agencies, and content marketers spend months agonizing over brand messaging, pixel-perfect UI, and compelling launch announcements. But behind the glitzy LinkedIn posts and enthusiastic Product Hunt upvotes, there is an invisible graveyard of website launches.
Every day, beautifully designed websites go live only to be met with total silence from search engines.
Why? Because a marketing launch and an SEO launch are two entirely completely different disciplines. While your marketing team is busy scheduling email blasts and organizing webinars, Googlebot is quietly attempting to parse your domain. If your technical foundation is flawed, no amount of social media hype will save you from the SERP basement.
At BeVisible, we engineer automated SEO content that ranks continuously. We know exactly what search crawlers look for when evaluating a new domain. To ensure your new site doesn't spend its first critical weeks languishing in the "Discovered - currently not indexed" queue, you need a precise, technical strategy.
This 2026 guide breaks down the 9 non-negotiable website launch steps to secure technical crawler access, establish immediate relevance, and position your site to rank on Day 1.
The Difference Between a "Marketing Launch" and an "SEO Launch"
Before diving into the technical checklist, we need to separate the hype from the mechanics.
A marketing launch is designed for human consumption. It relies on forced momentum: PR outreach, social media countdowns, affiliate pushes, and paid acquisition. The goal is to drive a massive spike in immediate, short-term traffic.
An SEO launch is designed for machine consumption. It relies on frictionless architecture: clean code, clear directive tags, logical hierarchies, and optimized seed content. The goal is to facilitate a rapid, deep crawl of your database and secure long-term, compounding organic visibility.
 If you execute a marketing launch without an SEO launch, you end up with a "sugar rush" traffic chart that flatlines on Day 3. If you execute an SEO launch correctly, that initial spike transitions smoothly into a steadily growing baseline of organic demand.
Here is how to build that foundation.
Step 1: Rip Off the noindex Band-Aid (And Verify Robots.txt)
The single most devastating—and shockingly common—website launch mistake is deploying a site to production with its staging environment restrictions still intact.
During development, it is standard practice to hide the staging site from search engines to prevent duplicate content issues or the indexing of unfinished pages. However, in the frantic final hours of a launch, developers frequently forget to remove these blockades.
The Three Places Invisibility Hides
Search engine blockades can be implemented in three different locations, and you must verify all of them on Day 1:
- The Meta Robots Tag: Inspect your HTML
<head>. Look for<meta name="robots" content="noindex, nofollow">. If this exists on your live site, Google will drop the page from its index immediately. It must be changed toindex, followor removed entirely. - The Robots.txt File: Navigate to
yourdomain.com/robots.txt. If you seeDisallow: /underUser-agent: *, you are telling every search engine on the planet to stay away. Update this file to allow crawling of your core directories while restricting sensitive areas (like/wp-admin/or internal search results). - The HTTP X-Robots-Tag Header: This is the invisible killer. Even if your meta tags and robots.txt are perfectly configured, a rogue server-level response header can issue a
noindexdirective.
The Failure Mode: Overlooking the Header Trap
Many modern CMS platforms and hosting providers (like WP Engine or Vercel) automatically append an X-Robots-Tag: noindex header to staging URLs. When the site is pushed to production, server misconfigurations can cause this header to stick. Because it isn't visible in the page source, SEOs often miss it until weeks of traffic have been lost.
Technical Validation:
To verify your headers, do not rely on your browser's "View Source" feature. Open your terminal and use a cURL command:
curl -I https://yourdomain.com
Look through the output for any mention of X-Robots-Tag. If it says noindex, contact your hosting provider or DevOps team immediately.
Step 2: Submit a Flawless XML Sitemap to Search Console
Do not wait for Google to naturally discover your new website through external links. You must actively force the issue by feeding the crawler a map of your architecture.
An XML sitemap is a machine-readable directory of every page, post, category, and media file you want indexed. On launch day, submitting this file is the equivalent of handing Googlebot a VIP access badge.
Constructing the Perfect Launch Sitemap
Not all sitemaps are created equal. A "dirty" sitemap filled with errors will damage your crawl budget and signal low quality to search engines.
- Status Code 200 Only: Ensure your sitemap only includes URLs that return a 200 OK status. Strip out any 301 redirects, 404 errors, or 500 server errors.
- Canonical Compliance: Only include canonical URLs. If you have parameterized URLs (like
?sort=price), keep them out of the sitemap. - Indexation Directives: Never include URLs that contain a
noindextag. It sends conflicting signals to the crawler: "Here is a page I want you to find, but please don't index it."
Technical Validation and Submission
Once your sitemap is generated (usually found at /sitemap.xml or /sitemap_index.xml), open Google Search Console (GSC).
- Navigate to the "Sitemaps" report in the left sidebar.
- Enter your sitemap URL and click "Submit."
- Monitor the "Status" column. It should read "Success."
Pro Tip: Don't forget about Bing. Submit the same sitemap to Bing Webmaster Tools. Bing powers Yahoo and DuckDuckGo, representing a non-trivial percentage of high-converting desktop traffic for SaaS companies.
Step 3: Implement and Test Your 301 Redirect Map
If your website launch is actually a redesign, migration, or domain change, Step 3 is the most critical phase of your entire project. Failing to map your old URLs to your new URLs will result in an immediate, catastrophic loss of organic traffic and historical PageRank.
The Mechanics of the 301
A 301 redirect is a permanent server-side directive that tells a browser (and a search engine crawler) that a page has moved. It passes approximately 90-99% of the SEO equity from the old URL to the new one.
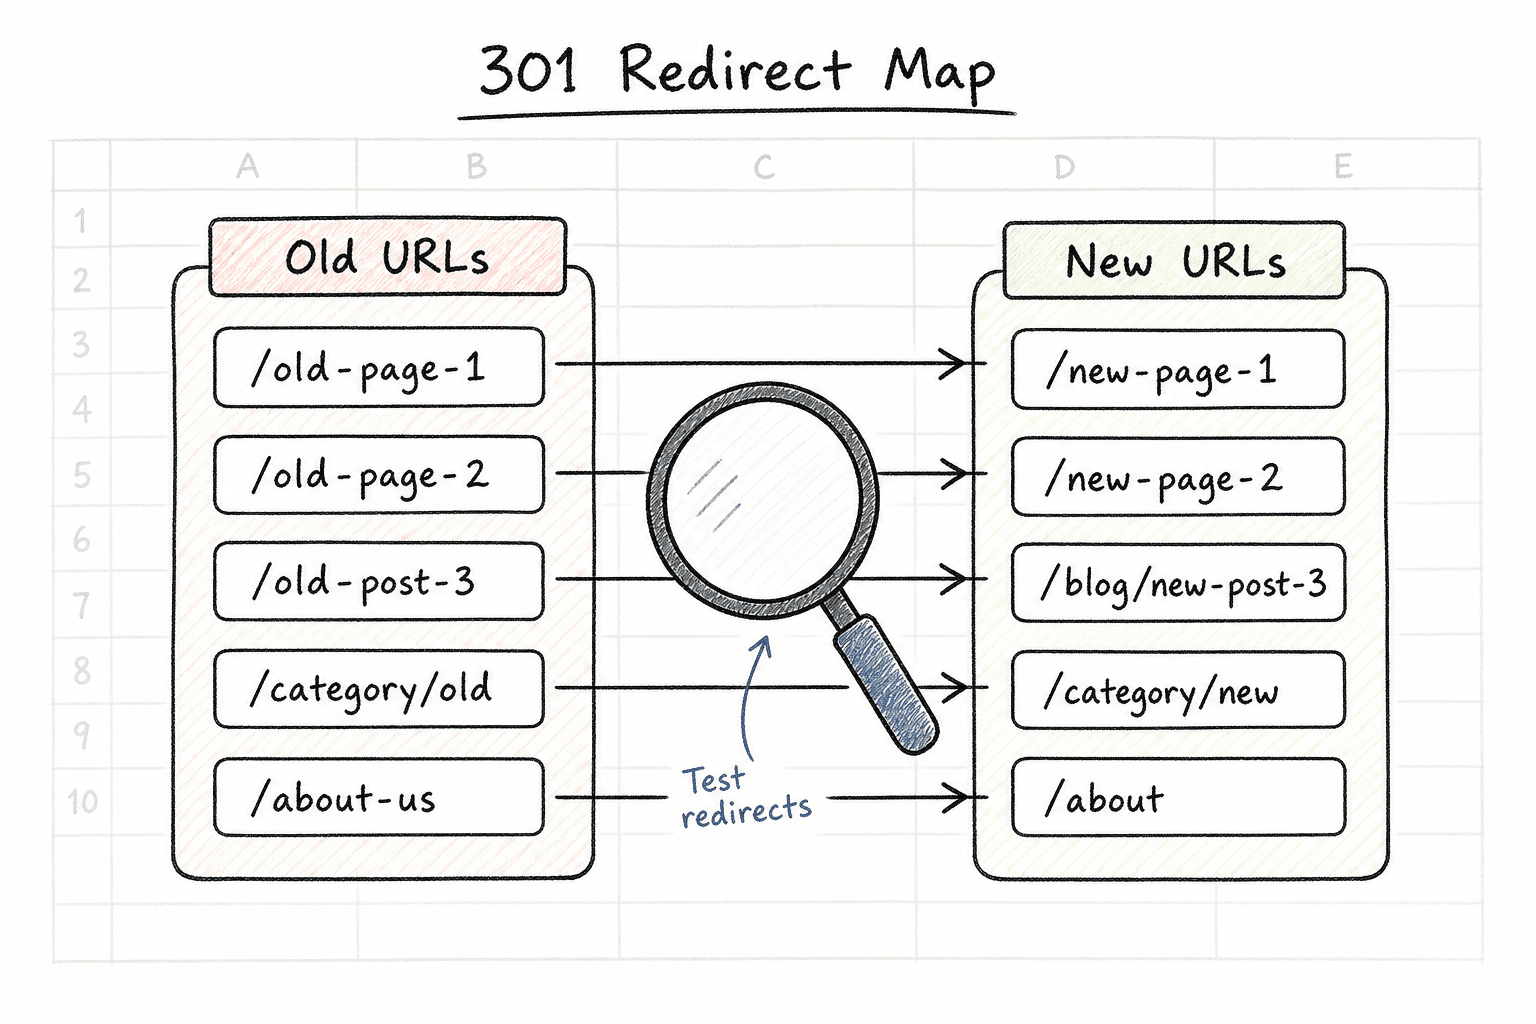
Building the Redirect Matrix
Months before launch, you should have exported every single URL from your old website using a crawler like Screaming Frog.
- 1-to-1 Mapping: The ideal scenario. The old page
/services/ai-automation/redirects seamlessly to the new page/features/ai-automation/. - Category Rollups: If you are deleting thin content pages, redirect them to the most relevant parent category page, not the homepage. Redirecting everything to the homepage is treated by Google as a soft 404, and the link equity is lost.
- Wildcard Redirects: Use RegEx (Regular Expressions) at the server level (Nginx or Apache) to handle massive, predictable structural changes (e.g., changing
/blog/2025/post-nameto just/post-name).
The Failure Mode: Redirect Chains and Loops
A redirect chain occurs when URL A redirects to URL B, which then redirects to URL C. Search engines will follow chains up to a certain point (usually 5 hops) before giving up. However, every hop slows down the user experience and dilutes link equity.
Ensure every old URL points directly to its final destination.
Step 4: Audit Core Web Vitals Before Google Does
In 2026, site speed and user experience are not just conversion rate optimization (CRO) metrics; they are direct ranking factors. Google’s Core Web Vitals (CWV) evaluate how fast a page loads, how quickly it becomes interactive, and how visually stable it is.
Launching a slow, bloated website guarantees poor indexing priority.
The Three Pillars of CWV
- Largest Contentful Paint (LCP): Measures loading performance. The main content of your page should load within 2.5 seconds.
- Interaction to Next Paint (INP): Measures interactivity and responsiveness. Pages should respond to user clicks or keystrokes in under 200 milliseconds.
- Cumulative Layout Shift (CLS): Measures visual stability. Elements should not jump around the screen as the page loads (keep the score below 0.1).
The Single Page Application (SPA) Edge Case
If your new site is a modern web app built on React, Angular, or Vue, your launch checklist just got significantly more complicated. Client-side rendering is notoriously problematic for Day 1 indexing because Googlebot must render the JavaScript before it can read the content—a resource-intensive process that delays indexing.
If you are going this route, you must implement server-side rendering (SSR) or dynamic rendering. For a deep dive, consult our guide on Single-Page Application SEO: What Works in 2026? or review SEO for Single Page Applications: The Technical Checklist.
Even basic implementation requires rigorous testing. You can read more about Implementing SEO in Single Page Applications (3 Ways), and for a broader overview of the strategy, check out SEO for Single Page Applications: A 5-Step Guide (2026).
Step 5: Publish "Answer-First" Seed Content
You cannot launch a "hollow" website. A beautiful homepage and a pricing page are not enough to establish semantic relevance in Google's Knowledge Graph.
To rank on Day 1, your site must launch with a foundation of high-quality "seed content." This content proves to the algorithm that your domain is a topical authority in its specific niche.
The Answer-First Paragraph Structure
Modern search engines—and AI overview engines like Perplexity and ChatGPT—do not have time for winding, anecdotal introductions. They want immediate answers.
At BeVisible, our automated blogging engine is built entirely around an "answer-first" methodology. When drafting your initial launch blog posts or glossary terms, structure your content aggressively:
- The Hook: A single sentence stating the premise.
- The Direct Answer: A bolded, two-sentence definition or answer to the search query.
- The Elaboration: Bullet points or structured data expanding on the nuance.
Planting the Right Seeds
Your launch should include at least 5-10 core hub pages and supporting long-form articles. If you're building these structural assets from scratch, follow the blueprint in How to Build an SEO Landing Page (7-Step Guide).
Do not launch a blog with "Welcome to our new website!" posts. Launch with targeted, keyword-backed content that immediately begins competing for organic demand.
Step 6: Fortify Your Internal Link Architecture
Crawlers follow links. If you have published 15 brilliant pieces of seed content, but they are not linked together in a logical hierarchy, Googlebot will struggle to find them. Pages with no incoming internal links are called "orphan pages," and they rarely rank.
Hub and Spoke Methodology
Before you hit the launch button, verify your internal linking structure:
- The Hub: Your main service or feature page (e.g., "Automated SEO Content").
- The Spokes: Your supporting blog posts (e.g., "How AI Scales Content Operations", "Best Automated Blogging Tools").
Every spoke must link back to the hub using exact-match or partial-match anchor text. Furthermore, the spokes should interlink with one another where relevant.
Footer and Header Navigation
Your main navigation should pass equity to your most important commercial pages. Avoid stuffing your main menu with dozens of dropdown links; this dilutes the PageRank flowing from your homepage. Keep the header focused on high-intent conversion pages, and use the footer to link out to secondary resources, legal pages, and content hubs.
Step 7: Configure Canonical Tags to Prevent Dilution
Duplicate content is the silent killer of website launches. Even if you haven't intentionally copied content, your CMS might be generating multiple versions of the exact same page.
How Duplicate Content Happens
To a search engine, the following four URLs are completely different pages, even if they load the exact same homepage:
http://yourdomain.comhttps://yourdomain.comhttp://www.yourdomain.comhttps://www.yourdomain.com
Furthermore, trailing slashes (/about vs /about/) and marketing parameters (?utm_source=linkedin) create infinite variations of your pages.
The Canonical Defense
A canonical tag (<link rel="canonical" href="https://yourdomain.com/page-url/" />) sits in the <head> of your HTML. It tells Google: "No matter how many variations of this URL you find, consider THIS specific URL to be the master copy, and apply all ranking signals to it."
Technical Validation:
- Ensure sitewide 301 redirects force all traffic to either the
wwwornon-wwwversion of your site. - Ensure sitewide 301 redirects force all HTTP traffic to HTTPS.
- Ensure every single page on your site has a self-referencing canonical tag by default.
Step 8: Force Early Crawling via Strategic Announcements
Now that the technical SEO foundation is flawless, you can leverage the "marketing launch" to trigger crawl activity.
Search engines use link discovery to find new domains. If your site launches in a vacuum, it might take weeks for Google to stumble upon it. You need to create "discovery vectors" by placing links on high-authority platforms that Google crawls constantly.
The SEO Value of Digital PR
When your marketing team issues a press release or coordinates a launch announcement, ensure they include clean, unoptimized, "do-follow" links back to your homepage.
Target high-Domain Rating (DR) platforms for your initial announcements:
- Product Hunt: A highly authoritative domain that Google crawls frequently.
- Industry Forums and Communities: Hacker News, Indie Hackers, or niche subreddits.
- Partner Blogs: Ask software partners or integration networks to mention your launch on their active blogs.
While social media platforms (LinkedIn, X) use nofollow links that do not pass SEO equity, they do pass traffic. High initial engagement metrics and social signals can indirectly validate the site's existence to search engines, prompting faster indexing.
Step 9: Monitor Day 1 Crawl Stats and Error Logs
The hours immediately following your launch are critical. You must actively monitor how search engines are interacting with your new architecture.
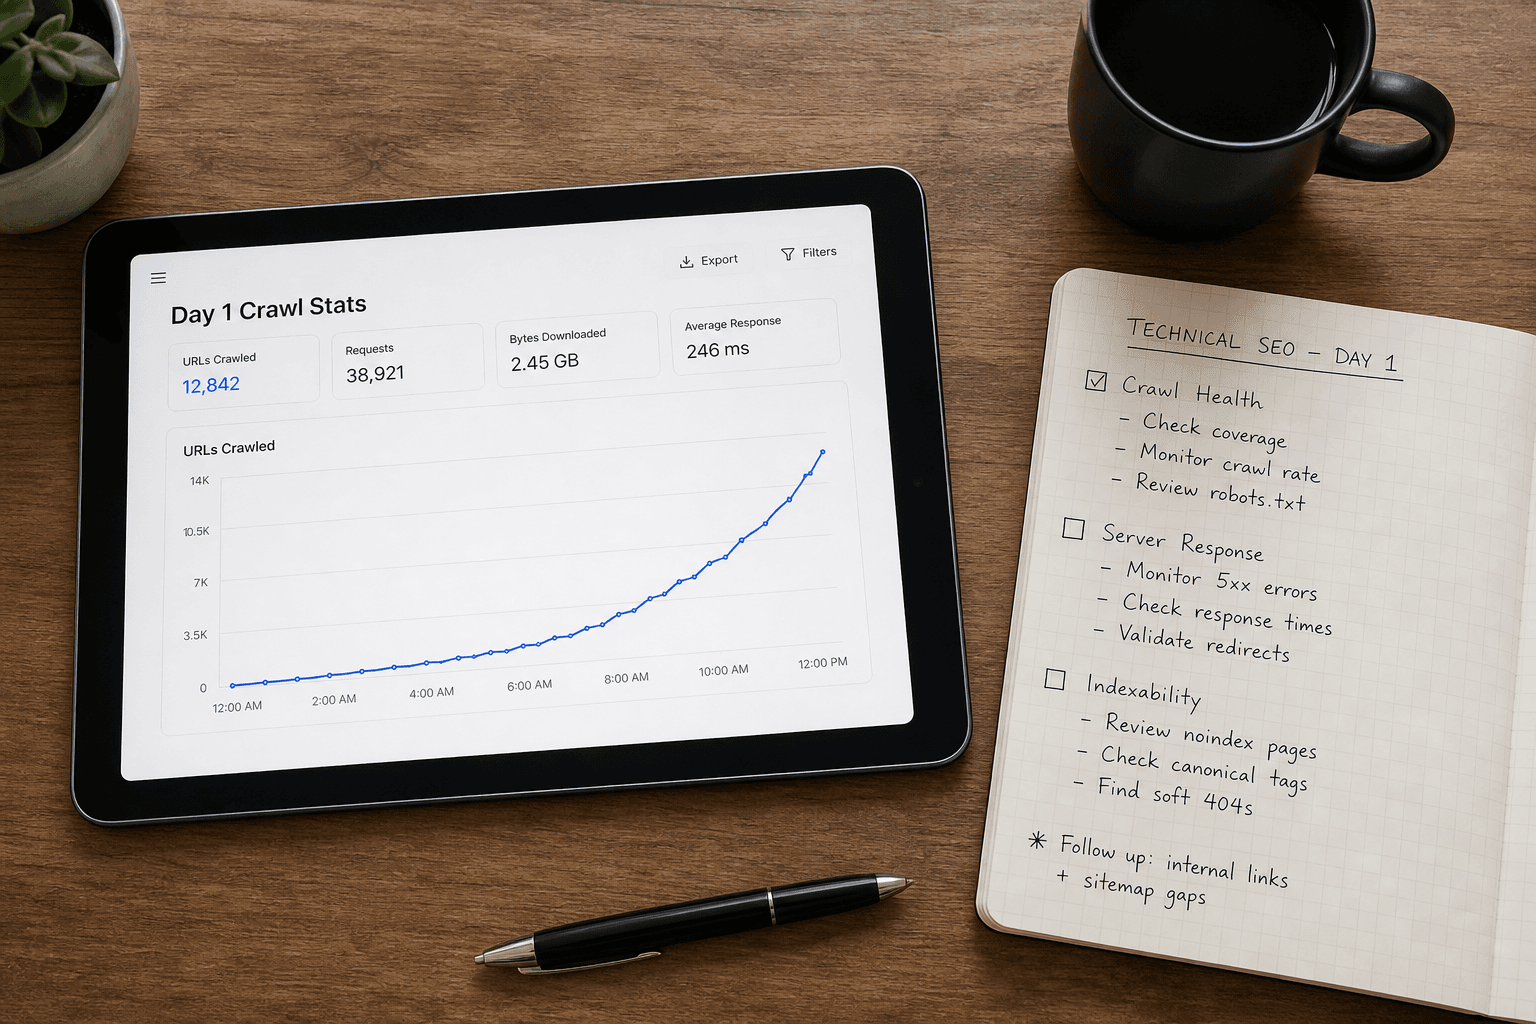
The GSC Command Center
Log into Google Search Console 24-48 hours post-launch and navigate to the Page Indexing report.
You are looking for a steady decrease in "Not Indexed" pages and a steady increase in "Indexed" pages. Pay close attention to the specific error buckets:
- Discovered - currently not indexed: Google knows the page exists but hasn't crawled it yet. If this number is massive, your site speed (LCP) might be too slow, causing the crawler to abandon the job.
- Crawled - currently not indexed: Google read the page but decided it wasn't worth putting in the database. This is a severe red flag indicating thin content, duplicate content, or poor internal linking.
- Server error (5xx): Your server crashed or timed out when Googlebot tried to access it. This often happens if you bought cheap shared hosting that cannot handle a launch-day traffic spike combined with an aggressive crawl rate.
Evaluating Third-Party Help
If you lack the technical bandwidth to execute this 9-step checklist, you might consider hiring an agency to manage the launch. Whether you are looking at local agencies—like the Top 7 Agencies for SEO in Durham (Ranked 2026)—or national firms, beware of predatory pricing.
You can compare standard rates in our guide to SEO Charges UK: Agency Rates vs Automation (2026). And if you're evaluating consultants in competitive technical markets, watch out for the Hiring SEO Services in Phoenix? 5 Red Flags (2026).
(Note: While this guide focuses heavily on traditional CMS and SaaS websites, the principles of Day 1 visibility apply everywhere. If your launch includes a secondary marketplace presence, you'll need specialized utilities, such as the 7 Best Etsy SEO Tools to Boost Sales in 2026.)
Automating Post-Launch Growth
Executing a flawless technical website launch is a massive achievement, but it is only the starting line.
Once the noindex tags are removed, the sitemaps are processed, and your core pages are ranking, the real game begins: consistent, high-velocity content production. Search engines favor domains that demonstrate "freshness" and continuous expansion of topical authority.
Staying updated on post-launch algorithmic shifts and maintaining that momentum is a full-time job. To keep your internal team sharp, bookmark the 11 Best SEO Blogs Every SaaS Founder Needs (2026).
However, manually researching competitor gaps, drafting long-form content, and optimizing for both Google and AI search engines is an operational bottleneck that stalls most companies within three months of launch.
That is where the BeVisible automated SEO engine steps in. By autonomously analyzing SERP data, generating fluff-free, answer-first content, and publishing directly to your CMS, we ensure that your spectacular launch day is just the first of many compounding traffic records.